
Tabella dei Contenuti
- Come Funziona?
- Gli Strumenti Utilizzati
- La Struttura del Progetto
- Schema, Database e Funzioni Helper
- Modello Whisper per Creare Trascrizioni
- Configurazione del Database Vettoriale Upstash
- Agenti LLM per Reti di Entità e Relazioni
- Costruire la Mappa Mentale con NetworkX e Plotly
- Lo Step Finale: l'App Frontend con Streamlit
- Conclusioni
In questo articolo ti presenterò un progetto di data science end-to-end che utilizza Streamlit, Upstash e OpenAI per creare una migliore navigazione e comprensione della conoscenza utilizzando la network analysis.
Creeremo uno strumento dal nome Mind Mapper perché permetterà di creare mappe concettuali da una moltitudine di informazioni in input e passando da una knowledge base.
La motivazione è quella di andare oltre il "semplice" framework RAG (retrieval augmented generation, generazione potenziata dal recupero di dati da una sorgente esterna al modello), in cui un utente interroga un database vettoriale e la sua risposta viene quindi inviata a un LLM come GPT-4 per una risposta arricchita.
Mind Mapper sfrutta RAG per creare rappresentazioni di risultati intermedi utili per eseguire compiti di knowledge intelligence che ci consente a sua volta di comprendere meglio i risultati di output di RAG su documenti lunghi e non strutturati.
Quindi utilizzeremo RAG come passo fondamentale per costruire risposte diverse, non solo di nature testuali. Una mappa mentale è una di queste risposte.
- estrarre conoscenza da file testuali e audio
- utilizzare un database in-memory come SQLite per salvare, leggere e manipolare dati
- sfruttare un database vettoriale allo stato dell'arte per archiviare vettori in modo efficiente
- creare una mappa mentale usando GPT-4
- mettere tutto in interfaccia attraverso Streamlit
Utilizzeremo Streamlit come libreria per il rendering frontend della nostra logica. Tutto il codice sarà scritto in Python.
Se vuoi dare un'occhiata all'app che creeremo naviga l'app qui basso 👇
Un minimo di contesto: per usare l'app ti serviranno due informazioni:
- Una chiave API di OpenAI
- Endpoint REST e token di autenticazione del database vettoriale Upstash
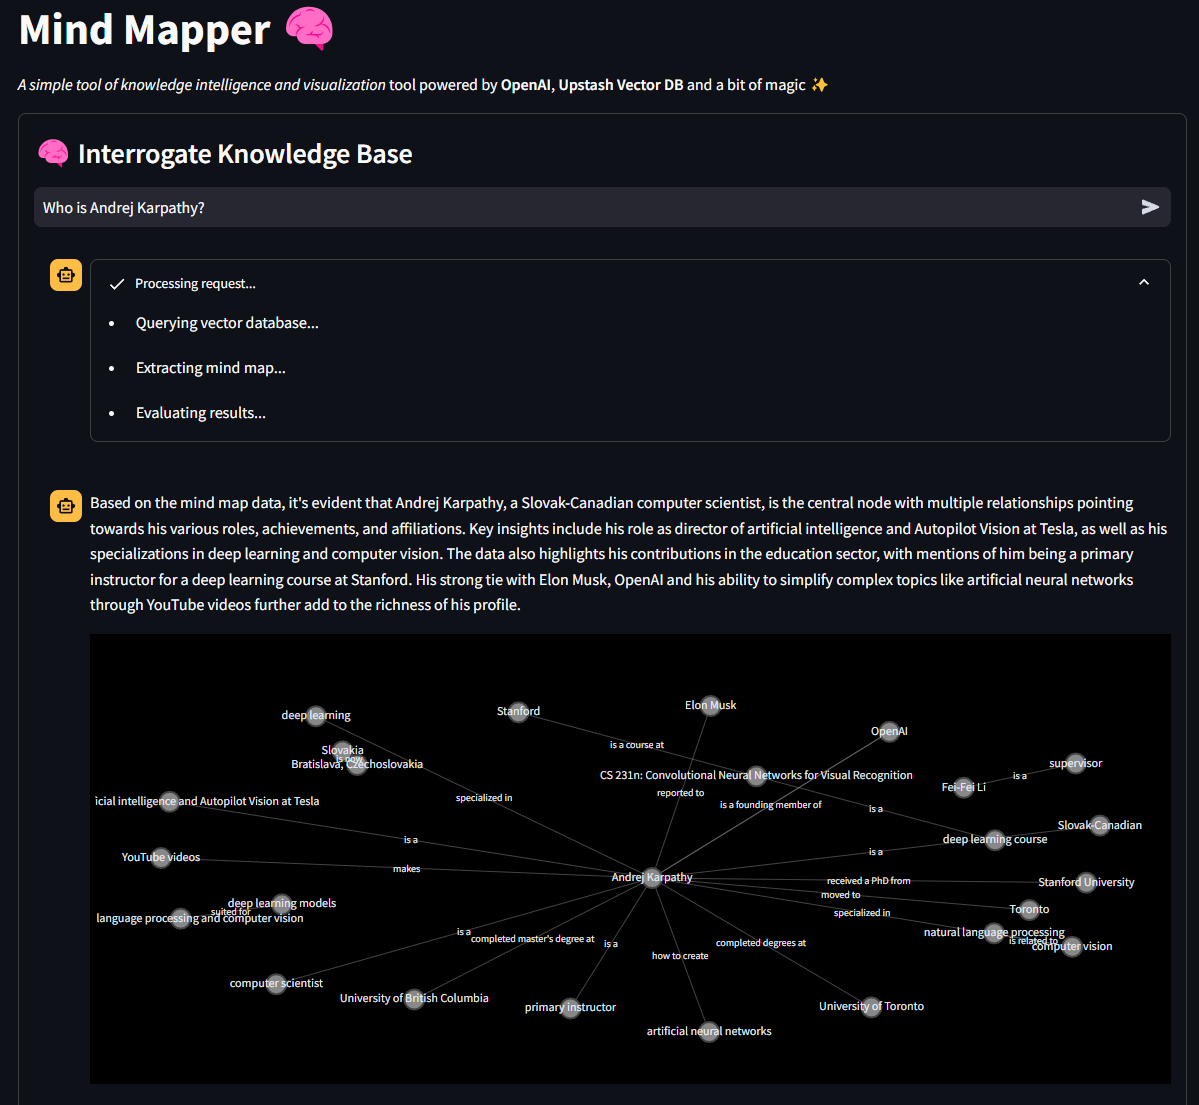
Una volta ottenuti questi (segui i link nell'app oppure continua a leggere l'articolo su come fare), puoi interrogare la knowledge base in base agli argomenti presenti nella demo del database. Questi argomenti ruotano ad OpenAI e il suo staff, come Sam Altman, A. Karpathy e altri. Non è possibile aggiungere file al database nella demo, ma alla fine di questo tutorial avrai modo di farlo sul tuo pc.
Ecco una demo di cosa può fare lo strumento in seguito al prompt "Who is Andrej Karpathy?"
Se questa introduzione ha stimolato la tua curiosità, allora unisciti a me e approfondiamo le spiegazioni e il codice! 💪
Ecco il Github del progetto se vuoi seguirlo
 andrea-dagostino
Come Funziona?
Il software funziona seguendo questo algoritmo
- l'utente carica o incolla il testo nel software e salva i dati in un database. L'utente può anche caricare una traccia audio che viene trascritta grazie al modello Whisper di OpenAI
- quando i dati vengono salvati, vengono suddivisi in blocchi testuali e questi blocchi vengono quindi vettorizzati utilizzando il modello OpenAI ada-002
- i vettori vengono salvati nel database vettoriale Upstash, con i metadati allegati
- quando l'utente pone una domanda all'assistente, la query viene vettorizzata utilizzando lo stesso modello e quel vettore viene utilizzato per recuperare i primi \( n \) blocchi più simili utilizzando la metrica di somiglianza del prodotto scalare
- questi pezzi di testo simili (chiamati chunks), che sono correlati alla query di input, vengono immessi in un agente AI dedicato ad estrarre entità e relazioni
- queste entità e relazioni costituiscono un dizionario Python che viene poi utilizzato per costruire la mappa mentale
- un altro agente legge il contenuto dello stesso dizionario e crea un commento per descrivere la mappa mentale ed evidenziare le informazioni rilevanti
FINE.
Gli Strumenti Utilizzati
Esaminiamo brevemente le dipendenze del progetto per comprendere meglio i blocchi che compongono la logica.
Poetry
Utilizzo Poetry praticamente per tutti i miei progetti. È un ambiente Python comodo e semplice e un gestore di pacchetti. Se vuoi saperne di più su Poetry, come installarlo e muovere i primi passi, ti lascio un link ad un articolo dedicato.
 Andrea D’Agostino
Se hai clonato il repository, tutto ciò che devi fare è eseguire il comando poetry install nella cartella del progetto nel tuo terminale. Poetry installerà e si prenderà cura di tutto.
Database vettoriale Upstash
Upstash è stata davvero una scoperta recente e sentivo di volerla testare con un vero progetto. Sebbene Upstash rilasciasse da tempo prodotti all'avanguardia, mancava un database vettoriale. Meno di un mese fa, l'azienda ha rilasciato proprio un database vettoriale che è completamente sul cloud e gratuito per la sperimentazione e molto altro ancora.
OpenAI
Come accennato, questo progetto sfrutta Whisper per la trascrizione di file audio e GPT-4 per consentire agli agenti di estrarre e commentare la mappa mentale. Se lo volessimo, potremmo anche utilizzare modelli open source.
Se non l'hai già fatto, puoi impostare una chiave API OpenAI a questo link qui 👉 https://platform.openai.com
NetworkX
NetworkX permette la creazione del componente della mappa mentale nel software. Si occupa di creare nodi di entità e connessioni tra queste. Con Plotly, la libreria di visualizzazione interattiva, è possibile visualizzare reti semplici e complesse. Puoi leggere di più sulla lib a questo link.
Streamlit
Va menzionato Streamlit perché rende possibile scrivere interfacce belle ed interessanti via Python. Un vero vantaggio per i data scientist che hanno poca conoscenza dei framework frontend e di JavaScript.
Ora che abbiamo un'idea migliore dei componenti principali del nostro software, iniziamo a costruirlo da zero!
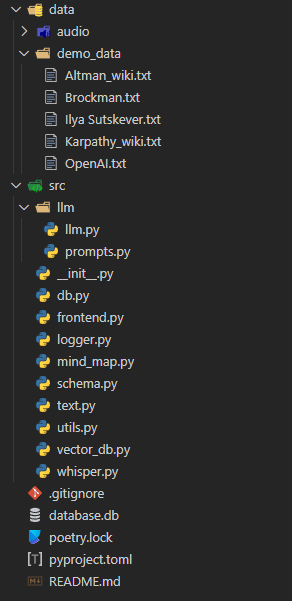
La Struttura del Progetto
Ecco come appare la struttura del progetto Mind Mapper.
(ricordo al lettore interessato che può leggersi l'articolo Come Strutturare un Progetto di Machine Learning per consigli su come organizzare il proprio progetto)
La logica è contenuta nella cartella src. Questa contiene il grosso della logica, mentre c'è una cartella dedicata per le parti LLM. Andremo passo dopo passo e costruiremo tutti gli script. Inizieremo con quello dedicato alla struttura dati, ovvero schema.py.
Schema, Database e Funzioni Helper
Iniziamo definendo lo schema delle informazioni. Spesso è la prima cosa che faccio quando lavoro con i dati. Utilizzeremo SQLModel e Pydantic per definire un oggetto Information che memorizzerà le informazioni e consentirà la creazione di tabelle in SQLite.
# schema.py

from sqlmodel import SQLModel, Field
from typing import Optional

import datetime
from enum import Enum

class FileType(Enum):
    AUDIO = "audio"
    TEXT = "text"
    VIDEO = "video"

class Information(SQLModel, table=True):
    id: Optional[int] = Field(default=None, primary_key=True)
    filename: str = Field()
    title: Optional[str] = Field(default="NA", unique=False)
    hash_id: str = Field(unique=True)
    created_at: float = Field(default=datetime.datetime.now().timestamp())
    file_type: FileType
    text: str = Field(default="")
    embedded: bool = Field(default=False)

    __table_args__ = {"extend_existing": True}
Ogni testo che inseriremo nel database sarà una Information. Avrà
- ID, che fungerà da chiave primaria e quindi sarà autoincrementale
- filename, che indicherà il nome del file caricato in formato stringa
- un title che l'utente può specificare facoltativamente in formato stringa
- hash_id: creato codificando con MD5 il testo. Utilizzeremo hash_id per eseguire operazioni sul database come lettura, eliminazione e aggiornamento
- created_at viene generato automaticamente utilizzando come valore predefinito la data e l'ora corrente che indica quando l'elemento è stato salvato nel database
- file_type indica se i dati di input erano testuali, audio o video (non implementati, ma potrebbero esserlo)
- text contiene i dati di origine utilizzati per l'intera logica
- embedded è un valore booleano che ci aiuterà a indicare gli elementi che sono stati incorporati e quindi presenti nel database dei vettori cloud
Nota: il pezzo di codice table_args = {"extend_existing": True} è necessario per poter accedere e manipolare i dati nel database da Streamlit.
Ora che abbiamo definito lo schema dei dati, scriviamo la nostra prima funzione di utilità: il logger. È una cosa incredibilmente utile da avere, e grazie alla libreria Rich ci divertiremo anche ad avere dei colori tipicamente inusuali nel terminale.
# logger.py

import logging
from rich.logging import RichHandler
from typing import Optional

def get_console_logger(name: Optional[str] = "default") -> logging.Logger:
    logger = logging.getLogger(name)
    if not logger.handlers:
        logger.setLevel(logging.DEBUG)
        console_handler = RichHandler()
        console_handler.setLevel(logging.DEBUG)
        formatter = logging.Formatter(
            "%(asctime)s - %(name)s - %(levelname)s - %(message)s"
        )
        console_handler.setFormatter(formatter)
        logger.addHandler(console_handler)

    return logger
Lo importeremo facilmente in tutti i nostri script principali.
Visto che ci siamo, scriviamo anche il nostro script utils.py con alcune funzioni di supporto.
# utils.py

import wave
import contextlib
from pydub import AudioSegment

import hashlib
import datetime

from src import logger

logger = logger.get_console_logger("utils")

def compute_cost_of_audio_track(audio_track_file_path: str):
    file_extension = audio_track_file_path.split(".")[-1].lower()
    duration_seconds = 0
    if file_extension == "wav":
        with contextlib.closing(wave.open(audio_track_file_path, "rb")) as f:
            frames = f.getnframes()
            rate = f.getframerate()
            duration_seconds = frames / float(rate)
    elif file_extension == "mp3":
        audio = AudioSegment.from_mp3(audio_track_file_path)
        duration_seconds = len(audio) / 1000.0  # pydub returns duration in milliseconds
    else:
        logger.error(f"Unsupported file format: {file_extension}")
        return

    audio_duration_in_minutes = duration_seconds / 60
    cost = round(audio_duration_in_minutes, 2) * 0.006  # default price of whisper model
    logger.info(f"Cost to convert {audio_track_file_path} is ${cost:.2f}")
    return cost

def hash_text(text: str) -> str:
    return hashlib.md5(text.encode()).hexdigest()

def convert_timestamp_to_datetime(timestamp: str) -> str:
    return datetime.datetime.fromtimestamp(int(timestamp)).strftime("%Y-%m-%d %H:%M:%S")
Non utilizzeremo la funzione compute_cost_of_audio_track in questa versione dello strumento, ma l'ho inclusa comunque se vuoi usarla.
hash_text verrà utilizzato molto per creare gli ID hash da inserire nel database, mentre convert_timestamp_to_datetime è utile per comprendere l'oggetto datetime predefinito inserito nel database al momento della creazione dell'elemento.
Ora diamo un'occhiata alla configurazione del database. Imposteremo l'interfaccia CRUD (create, read, update, delete) tradizionale:
# db.py

from sqlmodel import SQLModel, create_engine, Session, select
from src.schema import Information
from src.logger import get_console_logger

sqlite_file_name = "database.db"
sqlite_url = f"sqlite:///{sqlite_file_name}"
engine = create_engine(sqlite_url, echo=False)

logger = get_console_logger("db")

SQLModel.metadata.create_all(engine)

def read_one(hash_id: dict):
    with Session(engine) as session:
        statement = select(Information).where(Information.hash_id == hash_id)
        information = session.exec(statement).first()
        return information

def add_one(data: dict):
    with Session(engine) as session:
        if session.exec(
            select(Information).where(Information.hash_id == data.get("hash_id"))
        ).first():
            logger.warning(f"Item with hash_id {data.get('hash_id')} already exists")
            return None  # or raise an exception, or handle as needed
        information = Information(**data)
        session.add(information)
        session.commit()
        session.refresh(information)
        logger.info(f"Item with hash_id {data.get('hash_id')} added to the database")
        return information

def update_one(hash_id: dict, data: dict):
    with Session(engine) as session:
        # Check if the item with the given hash_id exists
        information = session.exec(
            select(Information).where(Information.hash_id == hash_id)
        ).first()
        if not information:
            logger.warning(f"No item with hash_id {hash_id} found for update")
            return None  # or raise an exception, or handle as needed
        for key, value in data.items():
            setattr(information, key, value)
        session.commit()
        logger.info(f"Item with hash_id {hash_id} updated in the database")
        return information

def delete_one(id: int):
    with Session(engine) as session:
        # Check if the item with the given hash_id exists
        information = session.exec(
            select(Information).where(Information.hash_id == id)
        ).first()
        if not information:
            logger.warning(f"No item with hash_id {id} found for deletion")
            return None  # or raise an exception, or handle as needed
        session.delete(information)
        session.commit()
        logger.info(f"Item with hash_id {id} deleted from the database")

def add_many(data: list):
    with Session(engine) as session:
        for info in data:
            # Reuse add_one function for each item
            result = add_one(info)
            if result is None:
                logger.warning(
                    f"Item with hash_id {info.get('hash_id')} could not be added"
                )
            else:
                logger.info(
                    f"Item with hash_id {info.get('hash_id')} added to the database"
                )
        session.commit()  # Commit at the end of the loop

def delete_many(ids: list):
    with Session(engine) as session:
        for id in ids:
            # Reuse delete_one function for each item
            result = delete_one(id)
            if result is None:
                logger.warning(f"No item with hash_id {id} found for deletion")
            else:
                logger.info(f"Item with hash_id {id} deleted from the database")
        session.commit()  # Commit at the end of the loop

def read_all(query: dict = None):
    with Session(engine) as session:
        statement = select(Information)
        if query:
            statement = statement.where(
                *[getattr(Information, key) == value for key, value in query.items()]
            )
        information = session.exec(statement).all()
        return information

def delete_all():
    with Session(engine) as session:
        session.exec(Information).delete()
        session.commit()
        logger.info("All items deleted from the database")
Con questo script saremo in grado di creare il database e leggere, creare, eliminare e aggiornare facilmente gli elementi uno per uno o in blocco.
Ora che abbiamo la nostra struttura informativa e un'interfaccia con il database, passiamo alla gestione dei file audio.
Modello Whisper per Creare Trascrizioni
Questo era un passaggio del tutto facoltativo, ma volevo rendere le cose più vivaci. Il nostro codice consentirà agli utenti di caricare qualsiasi file .mp3 o .wav e di trascriverne i contenuti tramite il modello Whisper di OpenAI.
Potrebbe interessare particolarmente a studenti universitari che registrano lezioni in aula.
Creiamo whisper.py e una singola funzione chiamata create_transcript.
from src.logger import get_console_logger

logger = get_console_logger("whisper")

def create_transcript(openai_client, file_path: str) -> None:
    audio_file = open(file_path, "rb")
    logger.info(f"Creating transcript for {file_path}")
    transcript = openai_client.audio.transcriptions.create(
        model="whisper-1", file=audio_file
    )
    logger.info(f"Transcript created for {file_path}")
    return transcript.text
Questa funzione è molto semplice ed è solo un semplice wrapper attorno al modulo audio di OpenAI.
L'occhio attento noterà che openai_client è un argomento della funzione. Questo non è un errore e vedremo perché tra un momento.
Ora possiamo gestire il testo in tutte le forme supportate, ovvero testo e audio di base. È giunto il momento di vettorizzare questi testi e inserirli nel nostro database vettoriale Upstash.
Configurazione del Database Vettoriale Upstash
Utilizzeremo diversi strumenti aggiuntivi qui per embeddare correttamente i nostri documenti per la ricerca vettoriale e RAG.
- Tiktoken: la famosa libreria di OpenAI che consente una tokenizzazione semplice ed efficiente basata su LLM (nel nostro caso GPT-3.5)
- LangChain: Adoro questa libreria e la trovo molto flessibile nonostante ciò che dice una parte della comunità. In questo progetto prendo in prestito da esso l'oggetto
RecursiveCharacterTextSplitter
Ancora una volta, se hai clonato il repository, Poetry importerà automaticamente le dipendenze richieste. In caso contrario, esegui semplicemente il comando poetry add langchain tiktoken.
Naturalmente dovremo anche installare Upstash Vector - il comando è poetry add upstash-vector. Una volta installato, visita la pagina https://console.upstash.com/ per configurare il tuo ambiente cloud.
Come ho detto prima, Upstash è uno strumento a pagamento, ma ha un livello gratuito molto generoso che ho ampiamente utilizzato per questo progetto. Il piano gratuito è adatto a piccoli progetti. Ha un limite di 10.000 query e 10.000 aggiornamenti giornalieri.
La scalabilità, inoltre, non è un problema poiché puoi facilmente adattare le tue esigenze.
Una volta terminato, prendi il tuo URL REST e il tuo token

Ora siamo pronti per scrivere lo script vector_db.py
# vector_db.py

from src.logger import get_console_logger

import tiktoken
from langchain.text_splitter import RecursiveCharacterTextSplitter
from upstash_vector import Vector
from tqdm import tqdm
import random

logger = get_console_logger("vector_db")

MODEL = "text-embedding-ada-002"
ENCODER = tiktoken.encoding_for_model("gpt-3.5-turbo")

def token_len(text):
    """Calculate the token length of a given text.

    Args:
        text (str): The text to calculate the token length for.

    Returns:
        int: The number of tokens in the text.
    """
    return len(ENCODER.encode(text))

def get_embeddings(openai_client, chunks, model=MODEL):
    """Get embeddings for a list of text chunks using the specified model.

    Args:
        openai_client: The OpenAI client instance to use for generating embeddings.
        chunks (list of str): The text chunks to embed.
        model (str): The model identifier to use for embedding.

    Returns:
        list of list of float: A list of embeddings, each corresponding to a chunk.
    """
    chunks = [c.replace("\n", " ") for c in chunks]
    res = openai_client.embeddings.create(input=chunks, model=model).data
    return [r.embedding for r in res]

def get_embedding(openai_client, text, model=MODEL):
    """Get embedding for a single text using the specified model.

    Args:
        openai_client: The OpenAI client instance to use for generating the embedding.
        text (str): The text to embed.
        model (str): The model identifier to use for embedding.

    Returns:
        list of float: The embedding of the given text.
    """
    # text = text.replace("\n", " ")
    return get_embeddings(openai_client, [text], model)[0]

def query_vector_db(index, openai_client, question, top_n=1):
    """Query the vector database for similar vectors to the given question.

    Args:
        index: The vector database index to query.
        openai_client: The OpenAI client instance to use for generating the question embedding.
        question (str): The question to query the vector database with.
        system_prompt (str, optional): An additional prompt to provide context for the question. Defaults to an empty string.
        top_n (int, optional): The number of top similar vectors to return. Defaults to 1.

    Returns:
        str: A string containing the concatenated texts of the top similar vectors.
    """
    logger.info("Creating vector for question...")
    question_embedding = get_embedding(openai_client, question)
    logger.info("Querying vector database...")
    res = index.query(vector=question_embedding, top_k=top_n, include_metadata=True)
    context = "\n-".join([r.metadata["text"] for r in res])
    logger.info(f"Context returned. Length: {len(context)} characters.")
    return context

def create_chunks(text, chunk_size=150, chunk_overlap=20):
    """Create text chunks based on specified size and overlap.

    Args:
        text (str): The text to split into chunks.
        chunk_size (int, optional): The desired size of each chunk. Defaults to 150.
        chunk_overlap (int, optional): The number of overlapping characters between chunks. Defaults to 20.

    Returns:
        list of str: A list of text chunks.
    """
    text_splitter = RecursiveCharacterTextSplitter(
        chunk_size=chunk_size,
        chunk_overlap=chunk_overlap,
        length_function=token_len,
        separators=["\n\n", "\n", " ", ""],
    )
    return text_splitter.split_text(text)

def add_chunks_to_vector_db(index, chunks, metadata):
    """Embed text chunks and add them to the vector database.

    Args:
        index: The vector database index to add chunks to.
        chunks (list of str): The text chunks to embed and add.
        metadata (dict): The metadata to associate with each chunk.

    Returns:
        None
    """
    for chunk in chunks:
        random_id = random.randint(0, 1000000) # workaround while waiting for metadata search to be implemented
        metadata["text"] = chunk
        vec = Vector(
            id=f"chunk-{random_id}", vector=get_embedding(chunk), metadata=metadata
        )
        index.upsert(vectors=[vec])
        logger.info(f"Added chunk to vector db: {chunk}")

def fetch_by_source_hash_id(index, source_hash_id: str, max_results=10000):
    """Fetch vector IDs from the database by source hash ID.

    Args:
        index: The vector database index to search.
        source_hash_id (str): The source hash ID to filter the vectors by.
        max_results (int, optional): The maximum number of results to return. Defaults to 10000.

    Returns:
        list of str: A list of vector IDs that match the source hash ID.
    """
    ids = []
    for i in tqdm(range(0, max_results, 1000)):
        search = index.range(
            cursor=str(i), limit=1000, include_vectors=False, include_metadata=True
        ).vectors
        for result in search:
            if result.metadata["source_hash_id"] == source_hash_id:
                ids.append(result.id)
    return ids

def fetch_all(index):
    """Fetch all vectors from the database.

    Args:
        index: The vector database index to fetch vectors from.

    Returns:
        list: A list of vectors from the database.
    """
    return index.range(
        cursor="0", limit=1000, include_vectors=False, include_metadata=True
    ).vectors
Questo script richiede una spiegazione più puntale.
get_embedding e get_embeddings vengono utilizzati per codificare uno o più testi e sono convenienti per avere un migliore controllo.
query_vector_db ci consente di interrogare Upstash per elementi simili al nostro vettore di query. In questa funzione incorporiamo la query ed eseguiamo la ricerca tramite il metodo .query dell'indice. L'indice, insieme al client di OpenAI, vengono passati come argomenti successivamente nell'app Streamlit. L'oggetto restituito è una stringa chiamata context che è una concatenazione dei primi \( n \) elementi più simili alla query di input.
Continuando, sfruttiamo RecursiveCharacterTextSplitter di LangChain per creare in modo efficiente blocchi testuali dai documenti.
Ora un po' di interfaccia CRUD anche per il DB vettoriale: aggiunta e recupero dei dati (anche l'aggiornamento e la cancellazione sono facilmente eseguibili e lo faremo nel frontend).
Ho aggiunto una semplice soluzione alternativa nel codice per sfogliare un gruppo di documenti (100k) e cercare manualmente l'ID hash. Ho letto online che presto implementeranno questa funzionalità.
Agenti LLM per Reti di Entità e Relazioni
Inizieremo a lavorare sulla codifica dei nostri comportamenti LLM lavorando prima sui prompt.
Ci saranno due agenti. Il primo è responsabile dell'estrazione dei dati di rete dal testo, mentre il secondo è responsabile dell'analisi dei dati di rete.
Il prompt al primo agente è il seguente:
You are an expert in creating network graphs from textual data.
You are also a note-taking expert and you are able to create mind maps from text.
You are tasked with creating a mind map from a given text data by extracting the concepts and relationships from the text.\n
The relationships should be among objects, people, or places mentioned in the text.\n

TYPES should only be one of the following:
- is a
- is related to
- is part of
- is similar to
- is different from
- is a type of

Your output should be a JSON containing the following:
{ "relationships": [{"source": ..., "target": ..., "type": ..., "origin": _source_or_target_}, {...}] } \n
- source: The source node\n
- target: The target node\n
- type: The type of the relationship between the source and target nodes\n

NEVER change this output format. ENGLISH is the output language. NEVER change the output language.
Your response will be used as a Python dictionary, so be always mindful of the syntax and the data types to return a JSON object.\n

INPUT TEXT:\n
L'agente analizzatore utilizza invece questo prompt
You are a senior business intelligence analyst, who is able to extract valuable insights from data.
You are tasked with extracting information from a given mind map data.\n
The mind map data is a JSON containing the following:
{{ "relationships": [{{"source": ..., "target": ..., "type": ..."origin": _source_or_target_}}, {{...}}] }} \n
- source: The source node\n
- target: The target node\n
- type: The type of the relationship between the source and target nodes\n
- origin: The origin node from which the relationship originates\n

You are to extract insights from the mind map data and provide a summary of the relationships.\n

Your output should be a brief comment on the mind map data, highlighting relevant insights and relationships using centrality and other graph analysis techniques.\n

NEVER change this output format. ENGLISH is the output language. NEVER change the output language.\n
Keep your output very brief. Just a comment to highlight the top most relevant information.

MIND MAP DATA:\n
{mind_map_data}
Questi due prompt verranno importati in modo Pythonico: cioè come script.
Creiamo uno script nella cartella LLM chiamato prompts.py e creiamo un dizionario di intenti in cui inseriamo i prompt come valori.
# llm.prompts.py

PROMPTS = {
    "mind_map_of_one": """You are an expert in creating network graphs from textual data.
    You are also a note-taking expert and you are able to create mind maps from text.
    You are tasked with creating a mind map from a given text data by extracting the concepts and relationships from the text.\n
    The relationships should be among objects, people, or places mentioned in the text.\n

    TYPES should only be one of the following:
    - is a
    - is related to
    - is part of
    - is similar to
    - is different from
    - is a type of

    Your output should be a JSON containing the following:
    { "relationships": [{"source": ..., "target": ..., "type": ...}, {...}] } \n
    - source: The source node\n
    - target: The target node\n
    - type: The type of the relationship between the source and target nodes\n

    NEVER change this output format. ENGLISH is the output language. NEVER change the output language.
    Your response will be used as a Python dictionary, so be always mindful of the syntax and the data types to return a JSON object.\n

    INPUT TEXT:\n
""",
    "inspector_of_mind_map": """
    You are a senior business intelligence analyst, who is able to extract valuable insights from data.
    You are tasked with extracting information from a given mind map data.\n
    The mind map data is a JSON containing the following:
    {{ "relationships": [{{"source": ..., "target": ..., "type": ...}}, {{...}}] }} \n
    - source: The source node\n
    - target: The target node\n
    - type: The type of the relationship between the source and target nodes\n
    - origin: The origin node from which the relationship originates\n

    You are to extract insights from the mind map data and provide a summary of the relationships.\n

    Your output should be a brief comment on the mind map data, highlighting relevant insights and relationships using centrality and other graph analysis techniques.\n

    NEVER change this output format. ENGLISH is the output language. NEVER change the output language.\n
    Keep your output very brief. Just a comment to highlight the top most relevant information.

    MIND MAP DATA:\n
    {mind_map_data}
    """,
}
In questo modo possiamo facilmente importare e utilizzare i prompt semplicemente puntando all'intento dell'agente (mind_map_of_one, inspector_of_mind_map). Importeremo i prompt nello script llm.py.
# llm.llm.py

from src.logger import get_console_logger
from src.llm.prompts import PROMPTS

logger = get_console_logger("llm")
MIND_MAP_EXTRACTION_MODEL = "gpt-4-turbo-preview"
MIND_MAP_INSPECTION_MODEL = "gpt-4"

def extract_mind_map_data(openai_client: object, text: str) -> None:
    logger.info(f"Extracting mind map data from text...")
    response = openai_client.chat.completions.create(
        model=MIND_MAP_EXTRACTION_MODEL,
        response_format={"type": "json_object"},
        temperature=0,
        messages=[
            {"role": "system", "content": PROMPTS["mind_map_of_one"]},
            {"role": "user", "content": f"{text}"},
        ],
    )
    return response.choices[0].message.content

def extract_mind_map_data_of_two(
    openai_client: object, source_text: str, target_text: str
) -> None:
    logger.info(f"Extracting mind map data from two texts...")
    user_prompt = PROMPTS["mind_map_of_many"].format(
        source_text=source_text, target_text=target_text
    )
    response = openai_client.chat.completions.create(
        model=MIND_MAP_INSPECTION_MODEL,
        response_format={"type": "json_object"}, # this is very important!
        messages=[
            {"role": "system", "content": PROMPTS["mind_map_of_many"]},
            {"role": "user", "content": user_prompt},
        ],
    )
    return response.choices[0].message.content

def extract_information_from_mind_map_data(openai_client_ object, data: dict) -> None:
    logger.info(f"Extracting information from mind map data...")
    user_prompt = PROMPTS["inspector_of_mind_map"].format(mind_map_data=data)
    response = openai_client.chat.completions.create(
        model="gpt-4",
        messages=[
            {"role": "system", "content": PROMPTS["inspector_of_mind_map"]},
            {"role": "user", "content": user_prompt},
        ],
    )
    return response.choices[0].message.content
Tutto il lavoro pesante viene svolto da due semplici funzioni che collegano semplicemente un agente GPT al prompt appropriato. Da notare response_format={“type"=”json_object"} nella prima funzione. Ciò garantisce che GPT-4 crei una rappresentazione JSON dei dati di rete del testo. Senza questa riga l'intera applicazione diventa incredibilmente instabile.
Mettiamo alla prova la logica. Quando viene visualizzato il messaggio "Who is Andrej Karpathy?" il primo agente crea questa rappresentazione di rete:
{
   "relationships":[
      {
         "source":"Andrej Karpathy",
         "target":"Slovak-Canadian",
         "type":"is a"
      },
      {
         "source":"Andrej Karpathy",
         "target":"computer scientist",
         "type":"is a"
      },
      {
         "source":"Andrej Karpathy",
         "target":"director of artificial intelligence and Autopilot Vision at Tesla",
         "type":"served as"
      },
      {
         "source":"Andrej Karpathy",
         "target":"OpenAI",
         "type":"worked at"
      },
      {
         "source":"Andrej Karpathy",
         "target":"deep learning",
         "type":"specialized in"
      },
      {
         "source":"Andrej Karpathy",
         "target":"computer vision",
         "type":"specialized in"
      },
      {
         "source":"Andrej Karpathy",
         "target":"Bratislava, Czechoslovakia",
         "type":"was born in"
      },
      {
         "source":"Andrej Karpathy",
         "target":"Toronto",
         "type":"moved to"
      },
      {
         "source":"Andrej Karpathy",
         "target":"University of Toronto",
         "type":"completed degrees at"
      },
      {
         "source":"Andrej Karpathy",
         "target":"University of British Columbia",
         "type":"completed master's degree at"
      },
      {
         "source":"Andrej Karpathy",
         "target":"OpenAI",
         "type":"is a founding member of"
      },
      {
         "source":"Andrej Karpathy",
         "target":"Tesla",
         "type":"became director of artificial intelligence at"
      },
      {
         "source":"Andrej Karpathy",
         "target":"Elon Musk",
         "type":"reported to"
      },
      {
         "source":"Andrej Karpathy",
         "target":"MIT Technology Review's Innovators Under 35 for 2020",
         "type":"was named one of"
      },
      {
         "source":"Andrej Karpathy",
         "target":"YouTube videos on how to create artificial neural networks",
         "type":"makes"
      },
      {
         "source":"Andrej Karpathy",
         "target":"Stanford University",
         "type":"received a PhD from"
      },
      {
         "source":"Fei-Fei Li",
         "target":"Stanford University",
         "type":"is part of"
      },
      {
         "source":"Andrej Karpathy",
         "target":"natural language processing",
         "type":"focused on"
      },
      {
         "source":"Andrej Karpathy",
         "target":"CS 231n: Convolutional Neural Networks for Visual Recognition",
         "type":"authored and was the primary instructor of"
      },
      {
         "source":"CS 231n: Convolutional Neural Networks for Visual Recognition",
         "target":"Stanford",
         "type":"is part of"
      }
   ]
}
Questi dati provengono da testo Wikipedia non strutturato caricato nello strumento a scopo di test. La rappresentazione sembra proprio buona! Sentiti libero di modificare le istruzioni per estrarre ancora più informazioni potenziali.
Tutto ciò che resta ora è utilizzare questo dizionario di relazioni Python per creare la nostra mappa mentale interattiva con NetworkX e Plotly.
Costruire la Mappa Mentale con NetworkX e Plotly
Ci sarà una sola funzione, ma sarà piuttosto complessa se non hai mai lavorato con NetworkX prima. Non è il framework più semplice con cui lavorare, ma i risultati che puoi ottenere con un po' di esperienza possono essere di valore.
Quello che faremo è inizializzare un oggetto grafico con G = nx.DiGraph(), che crea un nuovo grafo diretto. La funzione esegue un'iterazione su un elenco di relazioni fornite nel dizionario dati. Per ogni relazione, aggiunge un bordo al grafico G dal nodo sorgente al nodo destinazione, con un tipo di attributo che descrive la relazione.
for relationship in data["relationships"]:
        G.add_edge(
            relationship["source"], relationship["target"], type=relationship["type"])
Una volta terminato, il layout del grafico viene calcolato utilizzando l'algoritmo spring layout, che posiziona i nodi in modo da cercare di ridurre al minimo la sovrapposizione tra i bordi e mantenere uniforme la lunghezza dei bordi. Il parametro seed garantisce che il layout sia riproducibile.
Infine, il modulo Graph Objects (go) di Plotly si occupa di creare grafici a dispersione per ciascun punto dati, che rappresenta un nodo sul grafico.
Ecco come appare lo script mind_map.py.
# mind_map.py

import networkx as nx
from graphviz import Digraph

import plotly.express as px
import plotly.graph_objects as go

def create_plotly_mind_map(data: dict) -> go.Figure:
    """
    data is a dictionary containing the following
    { "relationships": [{"source": ..., "target": ..., "type": ...}, {...}] }
    source: The source node
    target: The target node
    type: The type of the relationship between the source and target nodes
    """

    ### START - NETWORKX LOGIC ###
    # Create a directed graph
    G = nx.DiGraph()

    # Add edges to the graph
    for relationship in data["relationships"]:
        G.add_edge(
            relationship["source"], relationship["target"], type=relationship["type"]
        )

    # Create a layout for our nodes
    layout = nx.spring_layout(G, seed=42)

    traces = []
    for relationship in data["relationships"]:
        x0, y0 = layout[relationship["source"]]
        x1, y1 = layout[relationship["target"]]
        edge_trace = go.Scatter(
            x=[x0, x1, None],
            y=[y0, y1, None],
            line=dict(width=0.5, color="#888"),  # Set a single color for all edges
            hoverinfo="none",
            mode="lines",
        )
        traces.append(edge_trace)

    # Modify node trace to color based on source node
    node_x = []
    node_y = []
    for node in G.nodes():
        x, y = layout[node]
        node_x.append(x)
        node_y.append(y)

    ### END - NETWORKX LOGIC ###

    node_trace = go.Scatter(
        x=node_x,
        y=node_y,
        mode="markers+text",
        # add text to the nodes and origin
        text=[node for node in G.nodes()],
        hoverinfo="text",
        marker=dict(
            showscale=False,
            colorscale="Greys",  # Change colorscale to grayscale
            reversescale=True,
            size=20,
            color='#505050',  # Set node color to gray
            line_width=2,
        ),
    )

    # Add node and edge labels
    edge_annotations = []
    for edge in G.edges(data=True):
        x0, y0 = layout[edge[0]]
        x1, y1 = layout[edge[1]]
        edge_annotations.append(
            dict(
                x=(x0 + x1) / 2,
                y=(y0 + y1) / 2,
                xref="x",
                yref="y",
                text=edge[2]["type"],
                showarrow=False,
                font=dict(size=10),
            )
        )

    node_annotations = []
    for node in G.nodes():
        x, y = layout[node]
        node_annotations.append(
            dict(
                x=x,
                y=y,
                xref="x",
                yref="y",
                text=node,
                showarrow=False,
                font=dict(size=12),
            )
        )

    node_trace.text = [node for node in G.nodes()]

    # Create the figure
    fig = go.Figure(
        data=traces + [node_trace],
        layout=go.Layout(
            showlegend=False,
            hovermode="closest",
            margin=dict(b=20, l=5, r=5, t=40),
            annotations=edge_annotations,
            xaxis=dict(showgrid=False, zeroline=False, showticklabels=False),
            yaxis=dict(showgrid=False, zeroline=False, showticklabels=False),
        ),
    )

    # Modify the layout to include the legend
    fig.update_layout(
        legend=dict(
            title="Origins",
            traceorder="normal",
            font=dict(size=12),
        )
    )

    # Modify the node text color for better visibility on dark background
    node_trace.textfont = dict(color="white")

    # Modify the layout to include the legend and set the plot background to dark
    fig.update_layout(
        paper_bgcolor="rgba(0,0,0,1)",  # Set the background color to black
        plot_bgcolor="rgba(0,0,0,1)",  # Set the plot area background color to black
        legend=dict(
            title="Origins",
            traceorder="normal",
            font=dict(size=12, color="white"),  # Set legend text color to white
        ),
        xaxis=dict(showgrid=False, zeroline=False, showticklabels=False),
        yaxis=dict(showgrid=False, zeroline=False, showticklabels=False),
    )

    for annotation in edge_annotations:
        annotation["font"]["color"] = "white"  # Set edge annotation text color to white

    # Update the color of the node annotations for better visibility
    for annotation in node_annotations:
        annotation["font"]["color"] = "white"  # Set node annotation text color to white

    # Update the edge trace color to be more visible on a dark background
    for trace in traces:
        if "line" in trace:
            trace["line"][
                "color"
            ] = "#888"  # Set edge color to a single color for all edges

    # Update the node trace marker border color for better visibility
    node_trace.marker.line.color = "white"

    return fig
Sentiti libero di copiare e incollare semplicemente questa funzione nella tua logica e modificarla come preferisci.
Ed è così che appare la mappa mentale alla domanda "Chi è Sam Altman?"
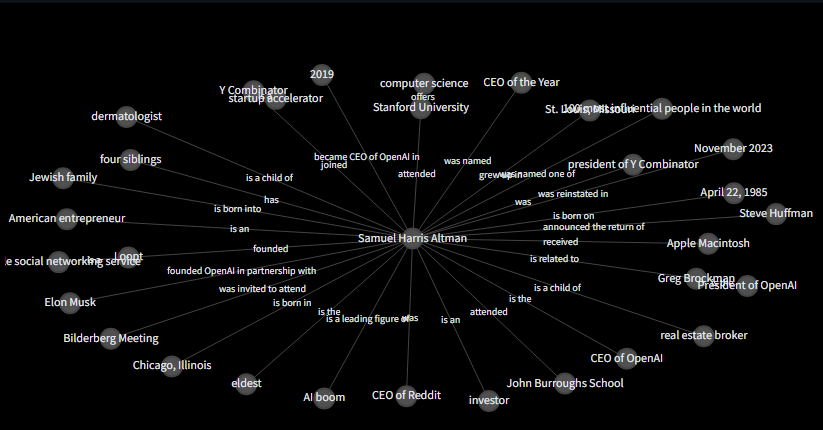
Ottimo lavoro! Abbiamo finito con la logica del backend! Il nostro ultimo passaggio è implementare l'app Streamlit.
Lo Step Finale: l'App Frontend con Streamlit
Ci siamo quasi. Grazie per aver letto fino a questo punto. Spero che il viaggio ti sia piaciuto fino ad ora.
Utilizzeremo un approccio modulare per creare l'app Streamlit - questo significa che tutti i blocchi logici verranno creati chiamando funzioni. Questa è la struttura dell'app
- Imposta la pagina
- Imposta l'hero section/l'introduzione della pagina
- Imposta la barra laterale
- Codifica della logica di inserimento dei file
- Imposta la sezione della ingestion
- Visualizza il database
- Visualizza la mappa mentale
- Avviate i motori!
Importeremo i moduli del database per aggiungere, rimuovere e aggiornare gli elementi. Importeremo le utilities e i file di schema per garantire la convalida tramite Pydantic e importeremo anche la logica del db vettoriale, la mappa mentale e llm. Fondamentalmente, tutto ciò che abbiamo costruito!
NamedTemporaryFile ci aiuta a salvare momentaneamente i file caricati per acquisire dati utili per l'archiviazione.
Ecco come è codificato il frontend:
# frontend.py
import streamlit as st
from src.logger import get_console_logger
from src.utils import hash_text, convert_timestamp_to_datetime
from src.schema import FileType
from src import db
from src.whisper import create_transcript
from src import vector_db
from src import mind_map
from src.llm import llm
from tempfile import NamedTemporaryFile
import pandas as pd
from openai import OpenAI
from upstash_vector import Index
logger = get_console_logger("frontend")
# CONSTANTS
AUDIO_FILE_TYPES = ["mp3", "wav"]
PAGE_TITLE = "Mind Mapper | Create mind maps from your files"
PAGE_ICON = "🧠"
LAYOUT = "wide"
SIDEBAR_STATE = "expanded"
if "OPENAI_API_KEY" not in st.session_state:
st.session_state["OPENAI_API_KEY"] = ""
if "UPSTASH_VECTOR_DB_REST_URL" not in st.session_state:
st.session_state["UPSTASH_VECTOR_DB_REST_URL"] = ""
if "UPSTASH_VECTOR_DB_TOKEN" not in st.session_state:
st.session_state["UPSTASH_VECTOR_DB_TOKEN"] = ""
openai_client = OpenAI(api_key=st.session_state["OPENAI_API_KEY"])
vector_db_index = Index(
url=st.session_state["UPSTASH_VECTOR_DB_REST_URL"],
token=st.session_state["UPSTASH_VECTOR_DB_TOKEN"],
)
def setup_page():
st.set_page_config(
page_title=PAGE_TITLE,
page_icon=PAGE_ICON,
layout=LAYOUT,
initial_sidebar_state=SIDEBAR_STATE,
)
def setup_hero():
st.markdown(
"""
# Mind Mapper 🧠
_A simple tool of knowledge intelligence and visualization_ tool powered by <b>OpenAI</b>, <b>Upstash Vector DB</b> and a bit of magic ✨
""",
unsafe_allow_html=True,
)
def setup_sidebar():
with st.sidebar:
st.markdown("## 🔑 API Keys")
# Example for setting up an API key input for OpenAI
st.markdown(
"### OpenAI"
"\nGet your API key [here](https://platform.openai.com/docs/quickstart?context=python)"
)
openai_api_key = st.text_input(label="OpenAI API Key", type="password")
# Example for setting up an API key input for Upstash Vector DB
st.markdown(
"### Upstash Vector DB"
"\nSetup your Vector DB [here](https://console.upstash.com/)"
)
upstash_vector_db_rest_url = st.text_input(
label="Upstash Vector DB REST url", type="default"
)
upstash_vector_db_token = st.text_input(
label="Upstash Vector DB Token", type="password"
)
# Add a button to confirm the API keys setup
if st.button("Set API Keys"):
st.session_state["OPENAI_API_KEY"] = openai_api_key
st.session_state["UPSTASH_VECTOR_DB_REST_URL"] = upstash_vector_db_rest_url
st.session_state["UPSTASH_VECTOR_DB_TOKEN"] = upstash_vector_db_token
st.success("API keys set successfully")
def ingest(hash_id: str):
# TODO
with st.spinner("Ingesting file..."):
# Assuming 'row' is defined elsewhere and accessible here
q = db.read_one(hash_id)
if not q.embedded:
chunks = vector_db.create_chunks(q.text)
vector_db.add_chunks_to_vector_db(
vector_db_index, chunks, metadata={"source_hash_id": q.hash_id}
)
db.update_one(q.hash_id, {"embedded": True})
st.success(f"Item {hash_id} ingested")
else:
st.warning(f"Item {hash_id} already ingested")
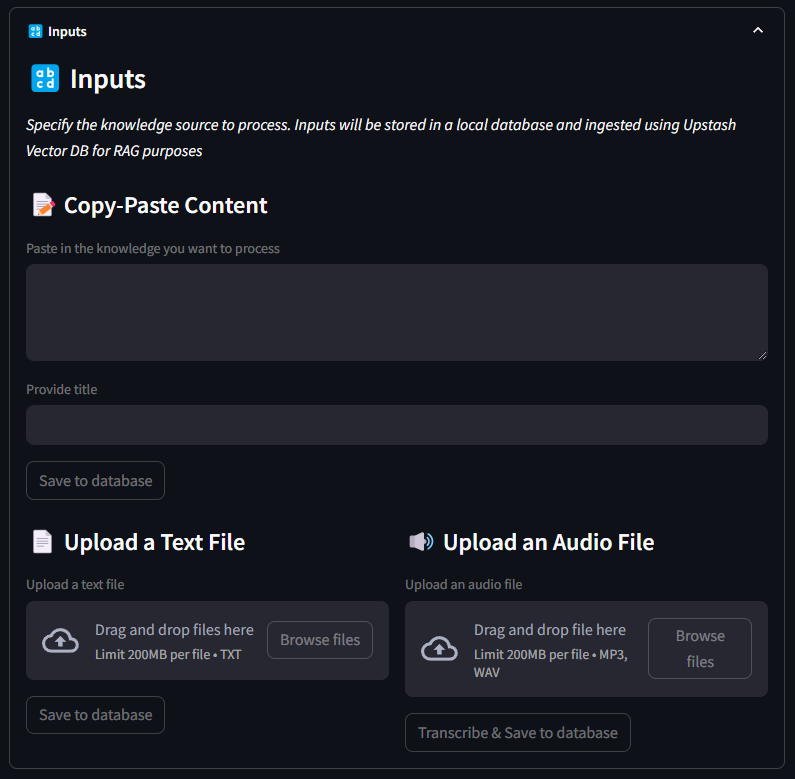
def text_input_area():
st.markdown("### 🔡 Inputs")
st.markdown(
"_Specify the knowledge source to process. Inputs will be stored in a local database and ingested using Upstash Vector DB for RAG purposes_"
)
st.markdown("#### 📝 Copy-Paste Content")
text = st.text_area(
"Paste in the knowledge you want to process",
height=50,
key="text_area",
disabled=True,
)
title = st.text_input("Provide title", key="title_text_area", disabled=True)
# save to db
if st.button("Save to database", key="text_area_save", disabled=True):
if text and title:
hash_id = hash_text(text)
db.add_one(
{
"filename": "*manual_input*",
"title": title,
"file_type": FileType.TEXT,
"hash_id": hash_id,
"text": text,
}
)
ingest(hash_id)
st.success("Text saved to database")
else:
st.warning("Please enter text and title to proceed.")
def upload_text_file():
st.markdown("#### 📄 Upload a Text File")
uploaded_text_file = st.file_uploader(
"Upload a text file",
type=["txt"], # Use the constant for file types
accept_multiple_files=True,
disabled=True,
)
# save to db
if st.button("Save to database", key="upload_text_save", disabled=True):
progress_text = "Saving text files to database..."
progress_bar = st.progress(0, text=progress_text)
if uploaded_text_file is not None:
if len(uploaded_text_file) == 1:
with NamedTemporaryFile(suffix=".txt") as temp_text_file:
temp_text_file.write(uploaded_text_file.getvalue())
temp_text_file.seek(0)
progress_bar.progress(int((1 / len(uploaded_text_file)) * 100))
hash_id = hash_text(temp_text_file.name)
db.add_one(
{
"filename": uploaded_text_file.name,
"title": uploaded_text_file.name,
"file_type": FileType.TEXT,
"hash_id": hash_id,
"text": temp_text_file.read().decode("utf-8"),
}
)
ingest(hash_id)
st.success("Text file saved to database")
else:
for file in uploaded_text_file:
with NamedTemporaryFile(suffix=".txt") as temp_text_file:
temp_text_file.write(file.getvalue())
temp_text_file.seek(0)
progress_bar.progress(
int(
(uploaded_text_file.index(file) + 1)
/ len(uploaded_text_file)
* 100
)
)
hash_id = hash_text(temp_text_file.name)
db.add_one(
{
"filename": file.name,
"title": file.name,
"file_type": FileType.TEXT,
"hash_id": hash_id,
"text": temp_text_file.read().decode("utf-8"),
}
)
ingest(hash_id)
st.success("Text file saved to database")
else:
st.warning("Please upload a text file to proceed.")
def upload_audio_file():
st.markdown("#### 🔊 Upload an Audio File")
uploaded_audio_file = st.file_uploader(
"Upload an audio file",
type=AUDIO_FILE_TYPES, # Use the constant for file types
disabled=True,
)
if st.button("Transcribe & Save to database", key="transcribe", disabled=True):
if uploaded_audio_file is not None:
extension = "." + uploaded_audio_file.name.split(".")[-1]
with NamedTemporaryFile(suffix=extension) as temp_audio_file:
temp_audio_file.write(uploaded_audio_file.getvalue())
temp_audio_file.seek(0)
with st.spinner("Transcribing audio track..."):
transcript = create_transcript(openai_client, temp_audio_file.name)
# Check if the transcript already exists in the database
existing_item = db.read_one(hash_text(transcript))
if existing_item is None:
hash_id = hash_text(transcript)
db.add_one(
{
"filename": uploaded_audio_file.name,
"title": uploaded_audio_file.name,
"file_type": FileType.AUDIO,
"hash_id": hash_id,
"text": transcript,
}
)
ingest(hash_id)
st.success("Transcription complete - item saved in database")
else:
st.warning("Transcription already exists in the database.")
else:
st.warning("Please upload an audio file to proceed.")
def visualize_db():
st.markdown("### 📊 Database")
all_files = db.read_all()
db_data = []
if len(all_files) > 0:
for file in all_files:
struct = file.model_dump()
db_data.append(
{
"id": struct["hash_id"],
"title": struct["title"],
"filename": struct["filename"],
"file_type": struct["file_type"].value,
"created_at": convert_timestamp_to_datetime(struct["created_at"]),
"text": struct["text"][0:50] + "...",
}
)
df = pd.DataFrame(db_data).rename(
columns={
"id": "ID",
"title": "Title",
"file_type": "Type",
"text": "Text",
"created_at": "Date",
}
)
st.dataframe(df, use_container_width=True)
# check if items are in db
items_selected = st.multiselect(
"Perform actions on:",
# [str(i) + " - " + str(j) for i, j in zip(df["title"], df["filename"])],
df["Title"].to_list(),
max_selections=10,
)
# delete selections from db
if st.button("Delete selected items", key="delete"):
for item in items_selected:
item_id = df[df["Title"] == item]["ID"].values[0]
db.delete_one(item_id)
ids_to_delete = vector_db.fetch_by_source_hash_id(
vector_db_index, item_id
)
st.success(f"Item {item_id} deleted from database")
try:
vector_db_index.delete(ids_to_delete)
st.success(f"Item {item_id} deleted from vector database")
except Exception as e:
st.error(f"Vector database deletion failed - {e}")
else:
st.info("No items in database")
def create_mind_map():
st.markdown("### 🧠 Interrogate Knowledge Base")
# get all document titles from db
all_files = db.read_all()
db_data = []
data = None
if len(all_files) > 0:
for file in all_files:
struct = file.model_dump()
db_data.append(
{
"hash_id": struct["hash_id"],
"title": struct["title"],
"created_at": convert_timestamp_to_datetime(struct["created_at"]),
}
)
df = pd.DataFrame(db_data).rename(
columns={
"hash_id": "hash_id",
"title": "title",
"created_at": "Date",
}
)
prompt = st.chat_input("Ask something about your knowledge base")
comment = "No data found."
llm_data = None
if prompt:
with st.chat_message("assistant"):
with st.status("Processing request...", expanded=True):
st.write("- Querying vector database...")
data = vector_db.query_vector_db(
index=vector_db_index,
openai_client=openai_client,
question=prompt,
top_n=5,
)
if data:
st.write("- Extracting mind map...")
llm_data = llm.extract_mind_map_data(openai_client, data)
llm_data = eval(llm_data)
st.write("- Evaluating results...")
comment = llm.extract_information_from_mind_map_data(
openai_client, llm_data
)
with st.chat_message("assistant"):
st.write(comment)
st.plotly_chart(
mind_map.create_plotly_mind_map(llm_data),
use_container_width=True,
)
else:
st.info("No items in database")
def start_frontend():
setup_page()
setup_hero()
setup_sidebar()
with st.container(border=True):
create_mind_map()
with st.expander("**🔡 Inputs**", expanded=True):
text_input_area()
col1, col2 = st.columns(2)
with col1:
upload_text_file()
with col2:
upload_audio_file()
with st.expander("**📊 Database**", expanded=False):
visualize_db()
if __name__ == "__main__":
start_frontend()Possiamo avviare l'applicazione eseguendo il comando streamlit run src/frontend.py.
Questo è il risultato finale:

Conclusioni
Questo articolo ti ha mostrato come creare un'applicazione AI semplice ma efficace utilizzando Streamlit, Upstash e OpenAI che va oltre il semplice framework RAG.
Nella sua semplicità, questa applicazione può davvero aiutarti a collegare i punti quando inserisci dati provenienti da fonti diverse e richiesti correttamente.
Se riesci a trovare un caso d'uso utile, condividi la tua storia con me e con la community aggiungendo un commento a questo articolo.
Alla prossima! 👋


Commenti dalla community